How to Check If Secure Boot Is Enabled in Windows 11

If you’ve recently upgraded to Windows 11 or want to improve your computer’s security, one of the first things you should verify is whether Secure Boot is enabled.
Secure Boot is a security feature built into UEFI firmware that ensures only trusted software loads during your computer’s startup. It plays an important role in secure startup, boot integrity, and malware prevention by blocking unauthorized bootloaders, rootkits, and other threats before Windows even begins to load.
In this guide, you’ll learn how to check if Secure Boot is enabled in Windows 11 using multiple methods, understand what the results mean, and discover why Secure Boot is an essential part of modern Windows security features.
Why You Should Check If Secure Boot Is Enabled
Checking your Secure Boot status isn’t just for IT professionals. It’s a useful step for anyone who wants a safer and more reliable computer.
Here are some reasons to verify your Secure Boot status:
- Confirm your PC meets Windows 11 security requirements.
- Improve hardware security and device security.
- Protect your system from bootkits and rootkits.
- Verify your PC is using UEFI Secure Boot instead of Legacy BIOS.
- Prepare your computer before installing Windows 11 or enabling BitLocker.
- Ensure the boot manager, system firmware, and startup files are protected.
If Secure Boot is turned off, your computer may still work normally, but it won’t benefit from one of the most important layers of startup protection.
Check Secure Boot Using System Information
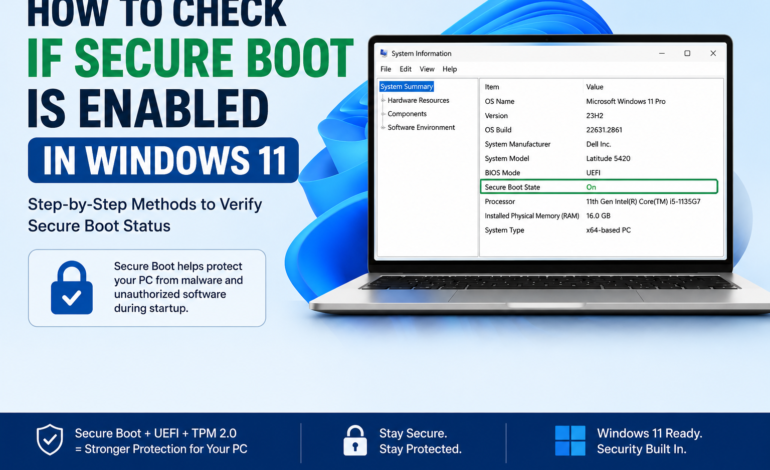
The easiest and most reliable way to check Secure Boot status is through the built-in Windows System Information tool.
This method takes less than a minute and doesn’t require administrator privileges.
Step 1: Open the Run Dialog
Press Windows + R on your keyboard.
The Run dialog box will appear.
Step 2: Launch System Information
Type:
msinfo32Then press Enter.
Windows will open the System Information window.
Step 3: Locate Secure Boot State
In the System Summary section, scroll down until you find:
- BIOS Mode
- Secure Boot State
You may see one of the following results:
| Secure Boot State | Meaning |
|---|---|
| On | Secure Boot is enabled and protecting your PC. |
| Off | Secure Boot is supported but currently disabled. |
| Unsupported | Your system is using Legacy BIOS or doesn’t support Secure Boot. |
Also check the BIOS Mode entry.
If it says UEFI, your computer supports Secure Boot.
If it says Legacy, you’ll need to switch to UEFI before you can enable Secure Boot.
Expert Tip: Don’t confuse BIOS Mode with Secure Boot State. A PC can be running in UEFI mode while Secure Boot is still turned off.
Why This Method Is Recommended
The msinfo32 tool is Microsoft’s official way to verify Secure Boot status. It’s fast, accurate, and available on every Windows 11 computer without requiring additional software.
In the next section, we’ll explore other methods to check Secure Boot, including the Windows Security app, PowerShell commands, and directly from your computer’s UEFI firmware. These options can be useful if you want to double-check your configuration or troubleshoot startup issues.
Check Secure Boot Using the Windows Security App
If you prefer a more visual approach, the Windows Security app provides an easy way to verify whether your PC supports modern security features. While it doesn’t always display the Secure Boot status directly on every device, it offers valuable information about your system’s security configuration.
Step 1: Open Windows Security
- Click the Start menu.
- Type Windows Security and open the app.
- Select Device Security from the left-hand menu.
Step 2: Review Device Security
Under Device Security, look for features such as:
- Secure Boot
- TPM 2.0
- Core Isolation
- Memory Integrity
If Secure Boot is active, Windows may indicate that your device meets the requirements for hardware-based security. On some systems, you may need to verify the exact status using the System Information (msinfo32) method covered earlier.
When Should You Use This Method?
The Windows Security app is useful when you want to review your PC’s overall security health, not just the Secure Boot status. It also helps confirm that other protection features are enabled and working together.
Method 3: Check Secure Boot Using PowerShell
PowerShell provides a quick way to verify your Secure Boot configuration using a built-in Windows command. This method is especially useful for advanced users, system administrators, and IT professionals who prefer command-line tools.
Step 1: Open PowerShell
- Right-click the Start button.
- Select Windows PowerShell (Admin) or Terminal (Admin).
- Approve the User Account Control prompt if it appears.
Step 2: Run the Command
Enter the following command:
Confirm-SecureBootUEFIPress Enter.
Understanding the Results
You may receive one of these responses:
| Result | Meaning |
|---|---|
| True | Secure Boot is enabled. |
| False | Secure Boot is disabled. |
| Cmdlet not supported | Your computer is using Legacy BIOS or does not support Secure Boot. |
This command provides one of the fastest ways to verify Secure Boot without navigating through multiple menus.
Note: The command only works on systems running in UEFI mode. If your device uses Legacy BIOS, PowerShell cannot confirm the Secure Boot status.
Method 4: Check Secure Boot in UEFI Firmware
If Windows cannot provide the information you need, you can verify Secure Boot directly from your computer’s firmware settings. This method is also helpful when troubleshooting startup issues or preparing to change Secure Boot settings.
Step 1: Open Advanced Startup
- Open Settings.
- Navigate to System > Recovery.
- Under Advanced Startup, click Restart now.
Step 2: Access UEFI Firmware Settings
After the restart:
- Select Troubleshoot.
- Choose Advanced options.
- Click UEFI Firmware Settings.
- Restart your computer again.
Your system will boot into the firmware interface.
Step 3: Locate the Secure Boot Option
The location varies by manufacturer, but it’s commonly found under:
- Boot
- Security
- Authentication
- Advanced Settings
If the setting displays Enabled, your computer is already protected by Secure Boot.
If it displays Disabled, you can enable it after confirming that your system is configured correctly for UEFI mode.
Which Method Should You Choose?
The following comparison can help you decide which method best fits your needs.
| Method | Difficulty | Best For | Requires Restart |
|---|---|---|---|
| System Information (msinfo32) | Easy | Most Windows users | No |
| Windows Security | Easy | Reviewing overall device security | No |
| PowerShell | Medium | Advanced users and IT professionals | No |
| UEFI Firmware | Medium | Confirming or changing firmware settings | Yes |
For most users, the System Information method remains the quickest and most reliable way to check whether Secure Boot is enabled.
Common Mistakes When Checking Secure Boot
It’s easy to misinterpret the results if you’re unfamiliar with Windows security features. Here are a few common mistakes to avoid.
Confusing UEFI Mode with Secure Boot
A computer can be running in UEFI mode while Secure Boot is still disabled. Always check both BIOS Mode and Secure Boot State before drawing conclusions.
Assuming TPM 2.0 Means Secure Boot Is Enabled
Although TPM 2.0 and Secure Boot often work together, they perform different functions. Having TPM 2.0 enabled does not automatically mean Secure Boot is active.
Ignoring the “Unsupported” Status
If Windows reports that Secure Boot is unsupported, your device may still be capable of using it. In many cases, the issue is that Windows was installed using Legacy BIOS instead of UEFI.
Why Secure Boot Is Important for Windows 11
Microsoft introduced stricter hardware security requirements with Windows 11 to provide better protection against modern cyber threats. One of the most important requirements is support for Secure Boot, which helps ensure your PC starts with trusted software only.
When Secure Boot is enabled, Windows verifies that the bootloader, operating system files, and critical drivers haven’t been modified by malicious software. This significantly reduces the risk of bootkits, rootkits, and firmware attacks.
Secure Boot also works alongside TPM 2.0, virtualization-based security (VBS), and other Windows security features to create multiple layers of protection. Together, these technologies strengthen your computer’s defenses from startup to shutdown.
Although some compatible PCs can install Windows 11 without Secure Boot enabled in certain scenarios, Microsoft recommends keeping it enabled to take full advantage of the operating system’s security architecture.
What If Secure Boot Is Disabled?
If the Secure Boot State shows Off, don’t panic. It doesn’t necessarily mean your computer is unsafe—it simply means this security feature isn’t currently protecting the startup process.
There are several reasons why Secure Boot might be disabled:
- The computer is running in Legacy BIOS mode.
- Secure Boot was manually disabled in the UEFI firmware.
- Windows was installed using an MBR partition instead of GPT.
- The motherboard requires additional firmware settings before Secure Boot can be enabled.
Fortunately, most of these issues can be resolved by changing a few settings in the UEFI firmware.
Troubleshooting Common Secure Boot Issues
Sometimes users cannot determine the Secure Boot status because of unexpected messages or configuration problems.
Secure Boot State Shows “Unsupported”
This usually means your system is running in Legacy BIOS mode instead of UEFI mode.
Before enabling Secure Boot, you’ll need to:
- Confirm that your motherboard supports UEFI.
- Convert the system drive from MBR to GPT if necessary.
- Switch the firmware mode from Legacy to UEFI.
PowerShell Returns an Error
If the Confirm-SecureBootUEFI command doesn’t work, check the following:
- Are you using Windows 11?
- Is the system booted in UEFI mode?
- Are you running PowerShell with administrator privileges?
If any of these conditions aren’t met, PowerShell may not be able to verify the Secure Boot status.
Secure Boot Option Is Missing
Some computers hide the Secure Boot option until specific requirements are met.
Possible causes include:
- Legacy Boot is still enabled.
- A Supervisor or Administrator BIOS password hasn’t been set.
- Outdated motherboard firmware.
- Compatibility Support Module (CSM) is enabled.
If you encounter this issue, don’t worry—we’ll cover every solution in our upcoming troubleshooting guide.
Expert Tip
Keep Secure Boot Enabled for Maximum Protection
Unless you have a specific reason to disable it—such as installing an unsupported operating system or testing custom firmware—it’s best to leave Secure Boot enabled.
Disabling Secure Boot removes an important layer of startup protection and may increase the risk of malware infecting your system before Windows loads.
For most users, enabling Secure Boot is one of the simplest ways to improve computer security without affecting everyday performance.
Frequently Asked Questions
How do I know if Secure Boot is enabled?
Open System Information (msinfo32) and check the Secure Boot State. If it says On, Secure Boot is enabled.
Is Secure Boot required for Windows 11?
Most Windows 11-compatible devices support Secure Boot, and Microsoft recommends keeping it enabled to strengthen system security.
Can I check Secure Boot without entering BIOS?
Yes. You can use System Information, Windows Security, or PowerShell to verify the Secure Boot status without accessing the UEFI firmware.
Does Secure Boot slow down my PC?
No. Secure Boot performs a quick verification during startup and has no noticeable impact on everyday performance.
Can I enable Secure Boot after installing Windows?
Yes. However, your computer must be configured for UEFI mode, and in some cases, the system drive must use the GPT partition style.
What happens if Secure Boot is disabled?
Windows will still start in most cases, but your PC loses an important layer of protection against boot-level malware and unauthorized startup software.
Does Secure Boot work with Linux?
Yes. Many modern Linux distributions support Secure Boot through signed bootloaders, allowing them to run without disabling this feature.
Is Secure Boot the same as TPM 2.0?
No. Secure Boot verifies trusted startup software, while TPM 2.0 securely stores encryption keys and supports features like BitLocker and Windows Hello.
Conclusion
Knowing how to check if Secure Boot is enabled is an important step toward improving your computer’s security. Whether you use System Information, Windows Security, PowerShell, or the UEFI firmware settings, Windows provides several reliable ways to verify your Secure Boot status.
If Secure Boot is already enabled, your system benefits from stronger startup protection against advanced threats. If it isn’t, the next step is to configure it correctly so your PC can take advantage of modern security features available in Windows 11.
By understanding your Secure Boot status today, you’re taking a proactive step toward building a safer and more secure computing environment.